

Air compressor is a versatile thing that can help you in many ways. If you have an air compressor at home, you can complete so many projects yourself. This is like a blessing for home improvement works. But the fact is, over time, the air compressor may have some issues. And the most common issue is leaking during operation.
Air compressor leakage is common and there are plenty of solutions for this. Common reasons for leaking from an air compressor are the hose, loosen parts, rust leak in the tank and more. But unfortunately, most of the people don’t know how to stop air compressor leaks.
Whenever you find the compressor is leaking, don’t assume that it is happening from the tank. Rather, some other things may cause it and you need to find out the exact issue. For example, the hose may cause the issue. However, in this article, I am going to share the ways that can help you to fix a tank of air compressor.
Necessary Tools
Before you start fixing works, you should keep the essential tools in hand. For tank leakage fixing, you will need Wrench, Teflon tape, Soapy water, Brazing torch, Brazing rod, and Angle grinder. Usually these things available at every home who love to do DIY projects. If any of these tools are missing, buy one and start your work.
Step by Step Process to Fix Tank Leakage
Here I am going to share the whole process step by step so that it becomes easy for you.
Step 1: Full Charge the Compressor
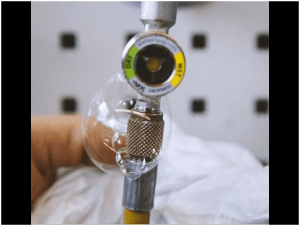
Before you go in detail works, turn on the air compressor and charge it fully which is essential for identifying the leakage. Now use the soapy water with a sprayer for finding the point of leakage. Spray all over the table including the emergency valve and other fittings. There will be bubbles at the spot that is causing leakage.
Look for the bubbles where you have sprayed the soapy water. If the problem is happening in the fittings, tighten up the fitting with the wrench. If leaking is continuing after proper tightening, probably the issue is in the tank. Go the next step for further works.
Step 2: Spray Soapy Water On the Tank
At the second step, spray the soapy water only all over the tank of the compressor. Spray gently so that it covers the whole tank perfectly. Check carefully to know if you have sprayed in each area. Now look for bubbles on the tank to find out the crack or rust leakage.
Once you have found the leakage area on the tank, stop spraying water on it.
Step 3: Release Air from the Compressor
As you have already identified the leaking area, you don’t have to keep the tank full of air. Turn off the compressor. Unplug it for releasing air. Release the air from inside of the tank through the valve. Open the valve and weight for a few minutes so that all air passes away from the tank.
Step 4: Grind the Leaking Area
The spot that you have pointed on the tank must have rust on it. So, you need to use the angle grinder for grinding the area smoothly. Keep grinding the area until it goes flat. Now you have cleaned the rust and it is time to cover the area.
Step 5: Use the Brazing Torch
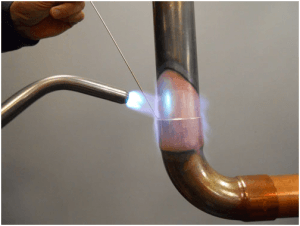
In this step, we will fix the leaking issue completely. For this, I recommend using a brazing torch with a brazing rod. Light on the brazing torch to give life on it. Now, apply the direct heat on the leaking area and place the rod on it for rebuilding and the area with welding.
Keep heating the area until the flame turns into blue. Press the heated rod metal so that it melts and set down on the tank. The heat will remove additional rust and the leaking area will be covered with metal.
Final Words
If you have followed the process step by step, there won’t be an issue of leaking anymore. Make sure that you are applying heat only to a particular area to avoid any issues. For safety, never keep any air on the tank. Also, use protecting gloves and glass for your safety.